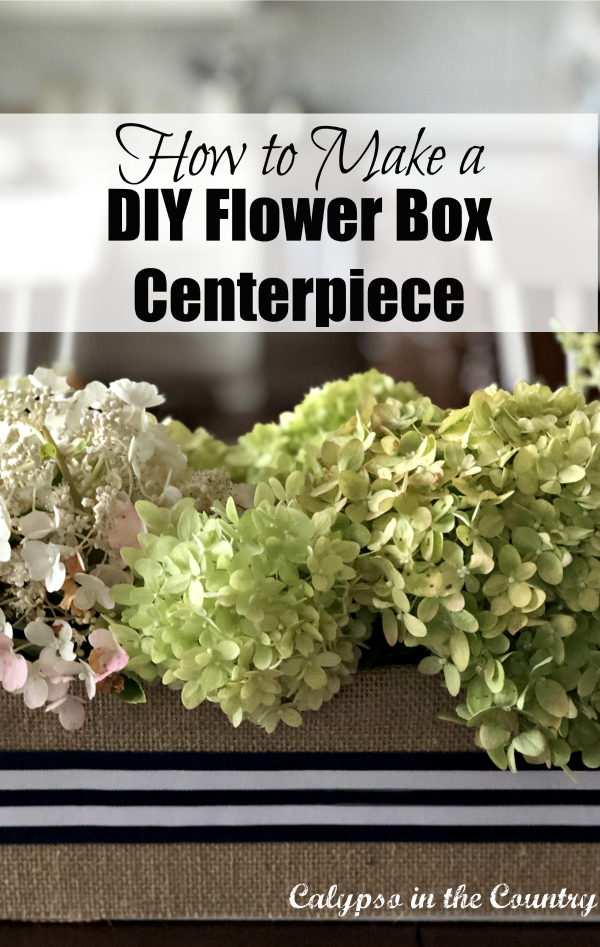
How to Make a Simple DIY Flower Box Centerpiece
Are you looking for creative ways to decorate your table without spending much money? Since many of us have been cleaning out our basements, let’s use some things we’ve found around the house! Today, I’m going to share how I turned a plain cardboard box into a simple DIY flower box centerpiece.
*Please also note that this post contains affiliate links. If you make a purchase after clicking my links below, I will receive a small commission (at no additional cost to you).
Simple DIY Flower Box Centerpiece:
Before I give you all the details on my DIY flower box project, I want to tell you that I’m joining a group of 16 bloggers for a Creative Craft Blog Hop! This blog hop is hosted by my talented friends, Chloe from Celebrate and Decorate and Andrea from Design Morsels. Be sure to visit them along with the rest of the bloggers listed at the end of this post. Get ready for tons of creative inspiration!
How to create a DIY flower box centerpiece:
Find your inspiration…
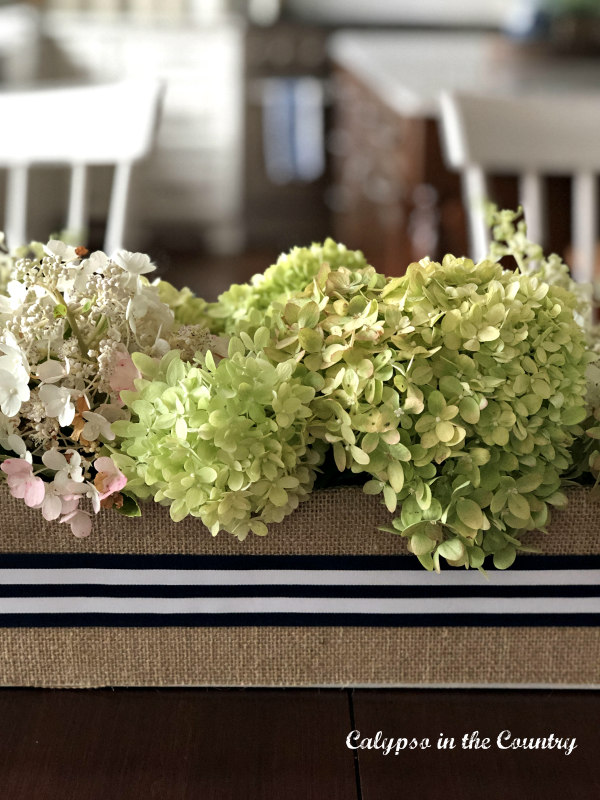
Recently, I had shared a post – 7 Easy Ways to Decorate with Hydrangeas which included an outdoor flower box filled with hydrangeas. Since I loved the look, I decided to make my own indoor DIY flower box centerpiece and fill it with hydrangeas.
Start with a long cardboard box…
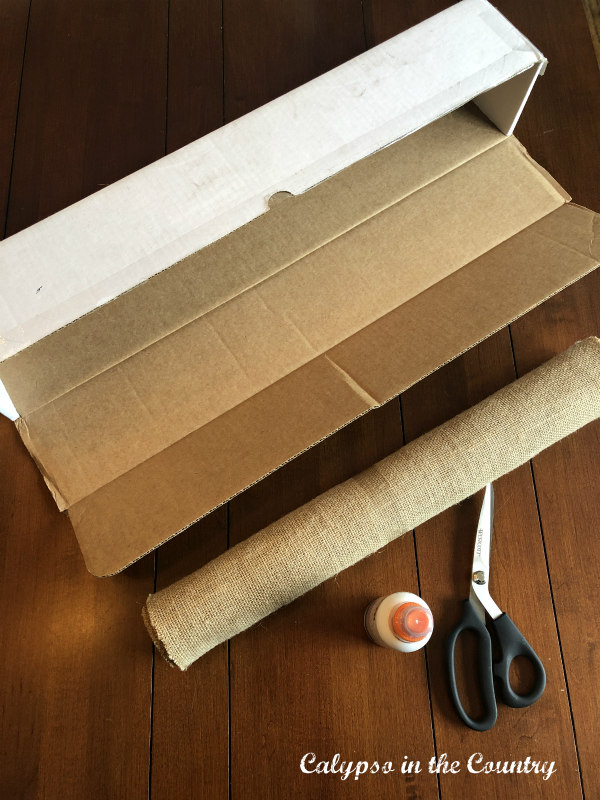
Recently, I found this long and narrow cardboard box in the basement. Originally, I think came from a poster we ordered. Anyway, with the dimensions of 25 inches long by about 4 1/2 inches wide, it reminded me of a flower box. To get started, all I had to do was cut off the top flap of cardboard and I was ready to go…
Cover the box with burlap…
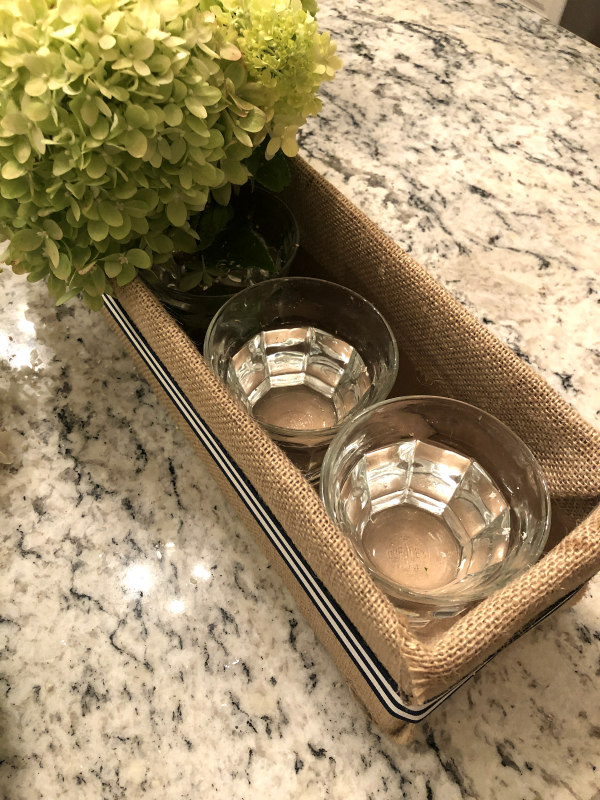
Since I had some burlap fabric lying around, I decided to cover the cardboard box with it.
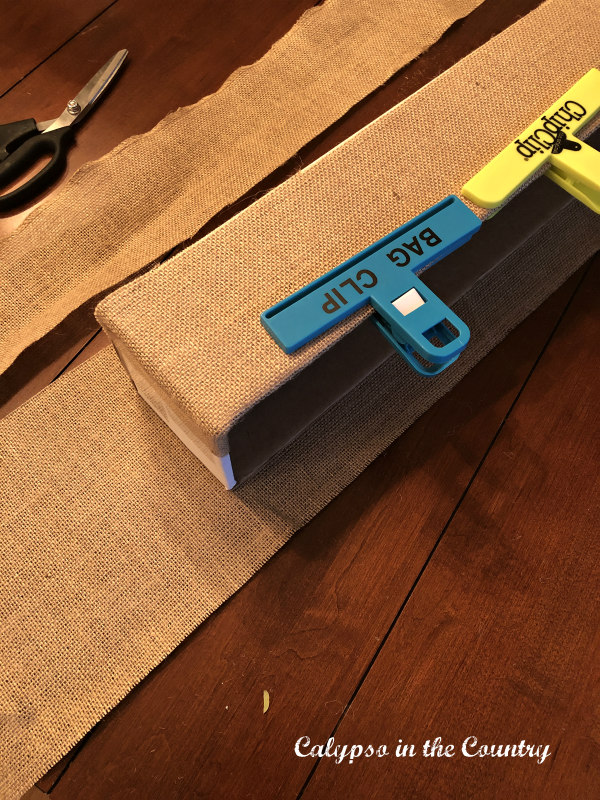
First, I cut the pieces of burlap and wrapped them around the box. To attach the pieces, I sprayed on some fabric glue and used clear packing tape on the edges.
Since burlap stretches a little when you work with it, it helped to pull it tight and secure it with the tape. To hold the burlap in place while the glue dried, I attached some bag clips.
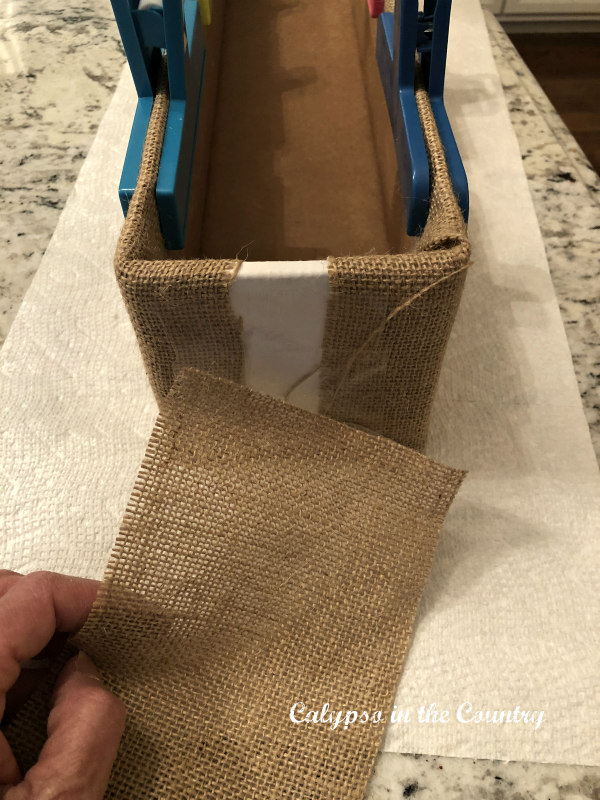
For the ends, I cut separate pieces to cover areas where the burlap pieces came together. Once again, I glued them down and secured the pieces with tape on the inside and bottom of the box.
Add some decorative interest…
To dress up the burlap a bit, I took one long piece of navy and white grosgrain ribbon and wrapped it around the center of the box.
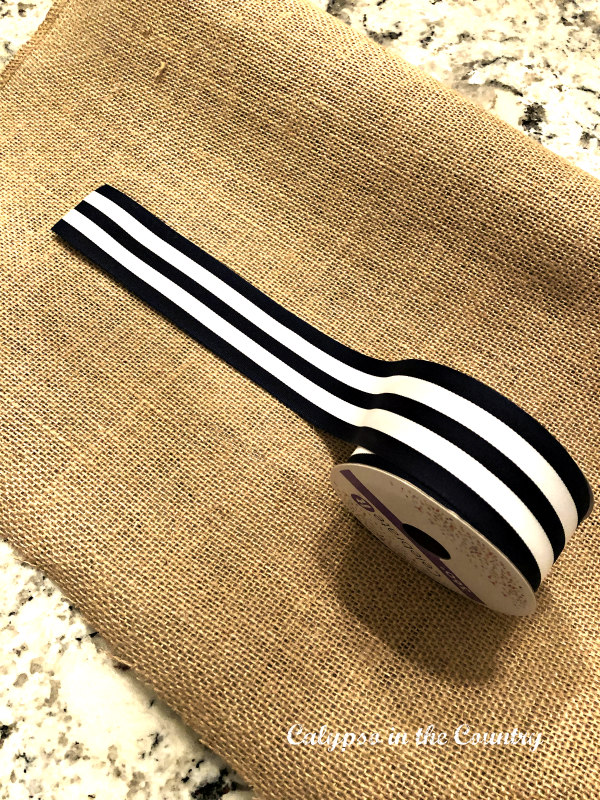
Rather than mess with the glue again, I simply ripped off small pieces of double sided tape and attached the ribbon to the burlap that way. It only took a minute or two and changed the whole look of my DIY flower box.
Gather your flowers…
Earlier in the day, I had clipped some hydrangeas from my backyard to use for my flower box. Since I wanted the flower box centerpiece to be overflowing with flowers, I used short glasses for the water inside. (Originally, I had planned to line the inside of the flower box with mason jars but they were too tall for the look I wanted.)
Of course, if you want your centerpiece to last longer, you could till the flower box with artificial flower stems.
Place your flower box in the center of the table…
For now, I’m using the flower box as a centerpiece for my kitchen table. Eventually, I’ll probably design a whole table setting around it.

*Update – here is how I decorated the flower box with a tablescape for fall!
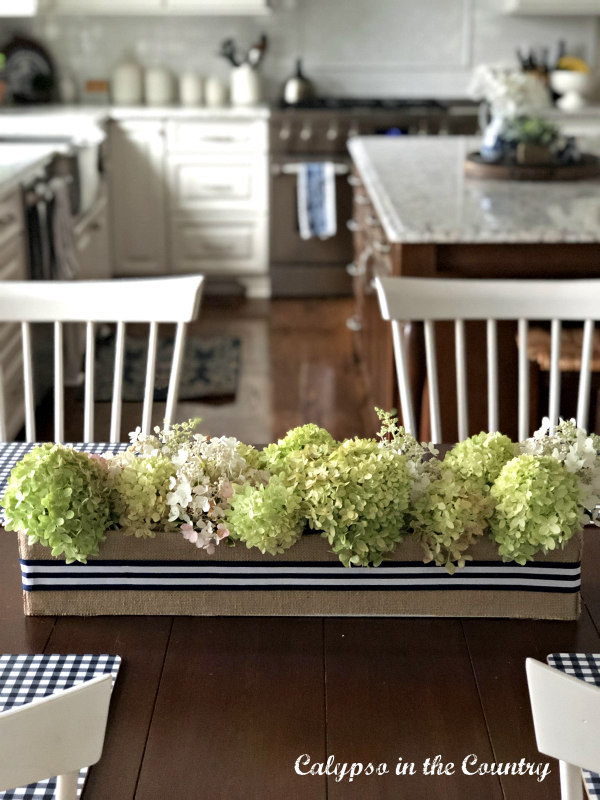
At some point, I’ll probably switch the flowers to something more colorful. Like I said, I clipped these flowers from my yard..gotta use what you have, right? For some early fall ideas using these hydrangeas, read my early fall decorating ideas.
In the future, I might dress up my DIY flower box by adding a monogram to the center of the ribbon. Maybe I’ll do that in “phase 2” when I set another table!
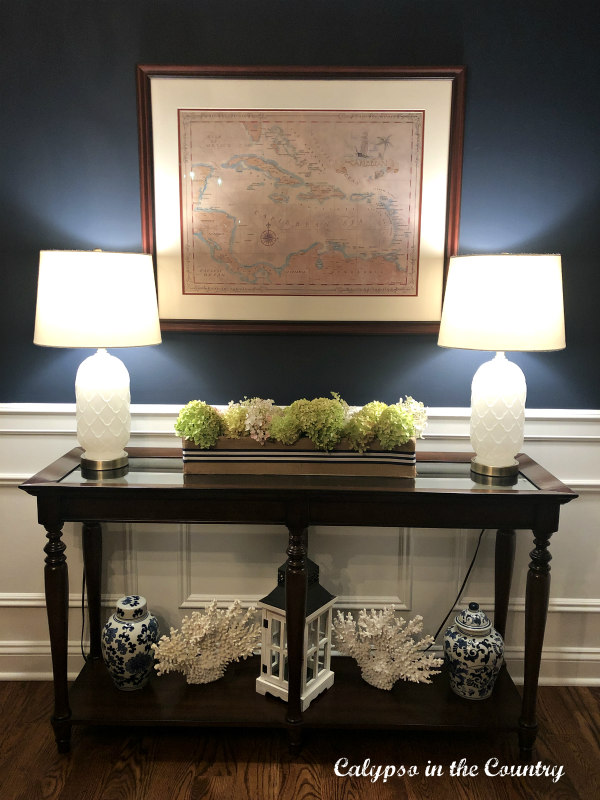
Since I can never leave well enough alone, last night I temporarily moved the flower box to the dining room. I love the way it works with my navy walls!
Hopefully, I’ve inspired you with my DIY flower box. With a little creativity it can be easy to decorate with items from your home. After all, decorating doesn’t have to be expensive…or difficult!
Items to Make a DIY Flower Box:
- Cardboard box – a long, thin one works best for a flower box but even a shoe box would be fine!
- Fabric – Even though I used burlap, any fabric would work depending on the look you want. At one point, I actually thought of cutting up an old gingham shirt!
- Scissors – Fabric scissors are helpful but any sharp scissors should work.
- Glue – a spray on glue works best to lightly coat the box but good ol’ Elmer’s would probably be fine too!
- Clear Packing Tape – Since you’ll be securing burlap or some kind of fabric, you need a strong tape.
- Grosgrain ribbon – Mine was from Michael’s but this ribbon looks just like mine.
- Flowers! – If you don’t have any in your yard, pick up some inexpensive ones at the grocery store. If you want to go with artificial flowers, choose ones with shorter stems or even these hydrangeas with detachable stems.
If you’re like me, you love an easy DIY!
For another easy DIY project for flowers, see how to make a cane wrapped vase!
Once again, thank you to Chloe from Celebrate and Decorate and Andrea from Design Morsels for hosting!
Please try to visit the rest of the participants on the Creative Craft Blog Hop from the list below. If you are following along in order, Zucchini Sisters is next on the list…
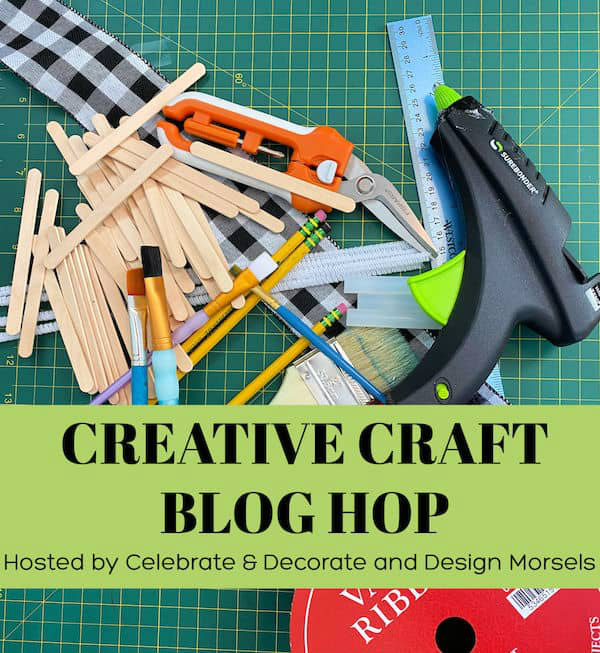
Celebrate And Decorate | Design Morsels | Calypso in the Country (this stop)
Zucchini Sisters | Birdz of a Feather
Decorate & More with Tip | Our Crafty Mom | The Painted Apron
Home Is Where The Boat Is | Purple Hues And Me | Sustain My Craft Habit
Chas’ Crazy Creations | Bluesky At Home | Create With Cynthia
What DIY projects are you working on this week?

Follow along so you don’t miss a post!
Subscribe by email – HERE


I LOVE This. I have a narrow dining room table and this would be such a great thing to make. Thank you so much. I even have the burlap. Your ribbon is so cute too. You’ve got my wheels turning.
Thanks so much, Andrea! I just wish my bright pink hydrangeas had started to bloom. Thanks again for hosting!
Hi Shelley I love this! I just shared how I repurposed a popular retailer’s shipping box. I love to find inspiration for other repurpose projects! Happy Day! Laura in Colorado
Thanks so much, Laura! I will swing by to check out your project too! Thanks for stopping by!
What a lovely recycle/upcycle flower box you’ve created, Shelley! Covering the box in burlap and adding the strip of ribbon truly makes it rustic chic and the size and length makes it exquisitely unique! I love it!
Thanks Gail! Might as well make use of all the junk I have laying around the house, right? I’m glad you like it! Thanks for stopping by!
You must of been looking at my Amazon want list! Shelley I have been looking at long box containers to place on our dining room table. I just didn’t want to spend a lot of money until I found the right one. Your craft today gave inspiration to make one until I can find one I like. Thanks. I love it.
Thanks so much Terrie! Great minds think alike, right? I’m looking forward to seeing how yours turns out… Always nice to hop with you!
Omg Shelley, this is brilliant!! I made something from a box too, and now I can’t wait to make this!! Making do with what we have these days {thank you Amazon!} I have several boxes that are candidates for a project like this! I love the burlap and ribbon, super cute!
Jenna
Thanks so much, Jenna! Yes, I agree that we need to make do with what we have. I think it actually forces us to be more creative! I’m working my way through the hop list now and I’m looking forward to seeing your cardboard box project! Enjoy the rest of your week!
This is so very cute and versatile! Looks amazing, great tutorial, thanks for sharing, and wonderful crafting with you friend.
Thanks Chas! I’m sure I’ll be updating it for other seasons as well. Great to hop with you again!
Shelley, I love this, and your hydrangeas are lovely! Pinned! Blessings, Cecilia @My Thrift Store Addiction
Thanks so much, Cecilia!
I’d never guess this was made from cardboard Shelley; it looks amazing. I really like how the hydrangeas look in it too so even though it was what you had, it really works! My biggest pet peeve with flowers on the table is that you can’t see people over them, so this is perfect for that.
Thanks so much, Sara! I know what you mean about tall centerpieces. I always try to keep mine as low as possible. Thanks for stopping by!
Isn’t it crazy how you can make something so awesome for such a small cost. I love how your project turned out. So fun hopping with you.
Thank you, Cynthia! Being home all the time forces us to be creative, doesn’t it? Great hopping with you too!
Shelley, this is really cute with a wonderful French flair. Reading through the post and pics i see you use small drinking glasses for the containers. I never even thought of using mine like that, and will reach for them in the future!
Thanks Rachelle! Yes, like I said, I envisioned it with mason jars but the small juice glasses fit much better. Thanks again for the visit!
What a great centerpiece, I love your combo of the burlap and ribbon! Happy to be hopping with you again. 🙂
Thanks Mary! It helps to have lots of craft supplies these days! Great hopping with you too!
Hi Shelley
How cute is this, love the ribbon going down the middle.
Your pool must be getting a workout, it’s been SO hot!
Cindy
Thanks so much, Cindy! Yes, we’ve been in the pool almost every day! Stay cool!
Shelley, this is brilliant! I never would have thought about using a cardboard box, that was genius! I really like that you could switch up the ribbon for any different holiday or table theme! Thanks so much for hopping with us!
Thanks so much, Chloe! Yes, I plan on using different ribbons to change the look. Thanks again for co-hosting again. I love being part of this talented group!
I would’ve never known that there was a cardboard box under that burlap, Shelley! I love when you can take an everyday item that would otherwise end up in the trash and turn it into an eye catching piece of decor. Hydrangeas are my favorite, and I love the white ones with the hints of blush pink. The black and white grosgrain ribbon was the perfect choice to compliment your arrangement. It was fun hopping with you again!
Thanks Rebecca! It was a fun and easy project…glad you liked it. As always, it was nice to hop with you!
What a great idea! You used something that most people would toss without a thought into the recycle bin. This is going to be great to use for decorating in any season.
Thanks, Paula! The shape of it caught my eye so it worked out well. Yes, I see some more seasonal decorating in its future!
I love a good upcycled cardboard box project! I’m always amazed at the transformation and your is beautiful! The hydrangeas remind me of my mom so I especially love this centerpiece idea. Thank you for the inspiration.
Thanks so much, Sonja! It’s always fun to get creative with what we have isn’t it? Great hopping with you!
Shelley, this DIY is a brilliant way to use all the packing boxes we accumulate. Add the ribbon was a great idea. I would need to use faux flowers as my hydrangeas don’t produce enough blooms for me to cut them. Really love this idea.
Thanks Carol! Yes, we do accumulate a ton of cardboard boxes these days, don’t we! I was hoping my pink or white hydrangeas would be blooming more but I had to go with the greenish ones for this project. I’m new to hydrangea growing so I still have a lot to learn. Thanks again and great hopping with you!
The flower box is absolutely adorable. Something so pretty about burlap and black and white ribbon.
Thank you so much! I wanted to keep it simple so the flowers could be the center of attention. Thanks for stopping by!
I love it when you can use what you already have, like a box! I’ve been saving some California Pizza Kitchen cardboard trays to cover and use. I already covered one in contact paper and used it to deliver treats when our dentist opened back up (individually wrapped, of course).
Liberty
Yes, always great when we can use what we have. Great idea for your cardboard trays! Thanks for stopping by, Liberty!
That turned out super cute! I wish we could have plants in our house, but our cat tends to eat them…
Thanks so much, Danielle! Try using some artificial plants or flowers. There are some great ones out there these days. Thanks for stopping by!
What a clever idea, you can change the fabric to suit the occasions. Pinned
Thank you, Anita! Yes, I plan on changing the ribbon with the seasons. I’m happy that you like it…and thanks for pinning!
How cute!!! I am a box hoarder…my husband will attest to it!! I have so many of these types of boxes and I need to make this….like, NOW!! Thank you for the inspo!!
Too funny…I guess I am also a box hoarder if I really think about it! Thanks so much! I’m happy I could inspire you!
Decorating is the easy part, but coming up with these fabulously creative DIY’s is quite another. I love this idea Shelley! Thank you so much for sharing with Charming Homes and Gardens!
Thanks Kim! I’m glad you liked it! Enjoy the rest of your week!
I just love this! What a great idea for displaying flowers. I like the way it creates a long, low display–you could actually leave this on the table during dinner, since people could see over it.
Thank you for joining the Grace at Home party at Imparting Grace. I’m featuring you this week!
Thanks so much, Richella! It was a fun yet very easy project. Thanks for the feature!
********************************************************
Thank you for sharing at #OverTheMoon. Pinned and shared. Have a lovely week. I hope to see you at next week’s party too! Please stay safe and healthy. Come party with us at Over The Moon! Catapult your content Over The Moon! @marilyn_lesniak @EclecticRedBarn
********************************************************
Thanks Marilyn!
Shelley,
What a lovely centerpiece. I love it. Congratulations, you are being featured at Over The Moon Linky Party. I hope you stop by.
https://www.eclecticredbarn.com/2020/08/over-moon-linky-party.html
Hugs,
Bev
Thanks so much, Bev! I’m so happy you liked my centerpiece! Enjoy your week!
Gorgeous centerpiece made out of a box. Brilliant idea!
Have a great day,
Kippi
Thanks Kippi! It was an easy DIY project!